

첫 Function package 만들기
현재 Component 경계
현재 @px.component는 process-local companion metadata와 Python annotation 기반 port shape를 등록합니다. 현재 V1의 기존 presentation·settings wire는 호환을 위해 보존하고 설치된 exact Component target은 production Flow reader에서 unsupported로 표시됩니다. 후속 V2 Canvas는 package UI를 마운트하지 않고 host-owned component.declarative@2만 사용합니다. settings를 component-declared-settings@1로 선언당 최대 8개까지 받고 host control registry가 그리며, rich surface는 RFC-016이 소유하는 component-rich-surface-declaration@1 범위이고, bridge는 Node context 읽기와 settings 제안까지만 허용합니다.
빈 폴더에서 reusable Function 하나와 그 Function을 배치한 Flow를 만듭니다. decorator는 Function definition만 등록합니다. 실제 Canvas Node는 flow.node(...)가 만들고, 모든 value 관계는 flow.connect(...)와 flow.result(...)로 명시합니다.
Component companion target은 @px.component로 등록하고 Component 작성과 사용을 따릅니다. 후속 V2 Canvas UI는 host-owned component.declarative@2만 사용합니다. Node에서 실행할 Python 계산은 Project-local이어도 @px.function으로 계약과 stable key를 명시합니다. decorator 없는 def는 Function·Component body 내부 helper로 사용합니다.
준비할 것
- CPython 3.12
- Python virtual environment를 만들 수 있는 terminal
- PXFLOW Studio가 포함된 PipelineXLab app 또는 Cloud workspace
- Function package를 배포할 때 사용할 PipelineXLab 계정
python3.12 -m venv .venv
source .venv/bin/activate
python -m pip install --upgrade pip
python -m pip install pipelinexlab
pxlab --versionWindows PowerShell에서는 virtual environment 활성화 명령만 바뀝니다.
.venv\Scripts\Activate.ps1이 가이드의 이름 규칙
PipelineXLab SDK에서 가져오는 이름은 하나의 namespace로 통일합니다.
from pipelinexlab import px- SDK 생성자·타입·decorator·field marker:
px.Flow,px.Results,@px.function,px.input(...),px.result(...) - 만든 Flow의 구성:
flow.input(...),flow.node(...),flow.connect(...),flow.result(...) - 설치한 package의 Function·Component: package에서 import한 symbol을
flow.node(...)의 target으로 전달 - 일반 Python 실행:
client = px.Client(workspace="...", project="...")뒤client.run(...)
px.는 이 이름이 PipelineXLab SDK에서 왔다는 뜻이고, flow.는 지금 구성하는 Flow가 그 작업을 소유한다는 뜻입니다. 따라서 Node 배치와 연결은 소유 Flow가 보이는 instance method로 씁니다. 전체 namespace 규칙도 함께 참고하세요.
1. Package 만들기
pxlab package init structural-checks --package-key structural_checks
cd structural-checks예제는 다음 source 구조를 사용합니다.
structural-checks/
├─ pyproject.toml
├─ src/
│  └─ structural_checks/
│     ├─ __init__.py
│     ├─ functions.py
│     └─ flows/
│        ├─ __init__.py
│        └─ girder_review.py
└─ tests/
└─ test_functions.py한 .py Flow module은 top-level public flow object를 정확히 하나 export합니다. Function과 data schema는 별도 module에 둘 수 있습니다.
[project]
name = "pipelinexlab-structural-checks"
version = "0.1.0"
requires-python = ">=3.12,<3.13"

[tool.pipelinexlab]
contract-version = 1
package-key = "structural_checks"
entry-module = "structural_checks"
public-module = "structural_checks"2. Function 작성하기
src/structural_checks/functions.py에 계산을 작성합니다.
from pipelinexlab import px


class GirderResults(px.Results):
    utilization: float


@px.function(
    key="girder_utilization",
    version="1.0.0",
    description="Calculates girder utilization from span and design moment.",
)
def girder_utilization(span: float, design_moment: float) -> GirderResults:
    resistance = span * 100.0
return GirderResults(utilization=design_moment / resistance)@px.function은 reusable Function definition과 metadata를 등록합니다. decorator 선언이나 import는 이 함수를 실행하거나 Canvas Node를 배치하지 않습니다. span과 design_moment는 target input port이고 utilization은 named result port입니다.
3. Flow 구성하기
src/structural_checks/flows/girder_review.py에 module-level composition을 작성합니다.
from pipelinexlab import px
from structural_checks.functions import girder_utilization


flow = px.Flow(
    "girder_review",
    label="Girder utilization",
    description="Checks one girder design case.",
)
span = flow.input("span", float, unit="m", description="Clear span.")
design_moment = flow.input(
    "design_moment",
    float,
    unit="kN.m",
    description="Factored design bending moment.",
)

utilization_check = flow.node(
    "utilization_check",
    girder_utilization,
)
flow.connect(span, utilization_check.inputs.span)
flow.connect(
    design_moment,
    utilization_check.inputs.design_moment,
)
flow.result(
    "utilization",
    utilization_check.results.utilization,
)girder_utilization은 Function definition이고 utilization_check는 실제 배치된 read-only Function Reference Node입니다. 복잡한 Flow도 큰 decorated function 하나로 감싸지 않고 이 top-level declarative 형식을 유지합니다.
4. 계산과 공개 계약 시험하기
python -m pip install pytest
python -m pytest
pxlab package check .계약 검사에서 다음 항목을 확인합니다.
- Function·Component definition과 Flow key가 유효하고 중복되지 않는지
- reusable Function에 version과 description이 있는지
@px.component의 label, description과 annotation 기반 port shape가 유효한지- V2 Canvas projection은 host-owned
component.declarative@2; settings는component-declared-settings@1· 선언당 최대 8개 - input/result의 type, unit, default와 constraint가 일치하는지
- 모든 Node가 stable
nodeKey를 가지는지 - 모든 Python Node target이 explicit key를 가진
@px.function인지 - input binding이 arbitrary placement keyword에 숨지 않았는지
- 모든 connection의 type, shape와 unit이 호환되는지
- module이 exported
flowobject 하나를 제공하는지
5. .pxflow 만들기
pxlab flow materialize . --flow girder_review --output dist/girder_review.pxflowmaterialization은 definition과 declarative placement·connection을 읽어 direct Flow object로 저장합니다. 이 단계에서는 target body를 실행하지 않습니다. 계산은 사용자가 Flow를 Run할 때 실행됩니다.
6. PXFLOW Studio에서 확인하기
pxlab studio open . --flow girder_reviewStudio에서 다음을 확인하세요.
- Flow 이름이 Girder utilization로 보입니다.
utilization_checkNode 하나가 보입니다.- 두 Flow input이 같은 이름과 단위로 Node input에 연결됩니다.
- Flow result에
utilization이 표시됩니다. - Node 상세에서
girder_utilization@1.0.0과 description을 확인할 수 있습니다.
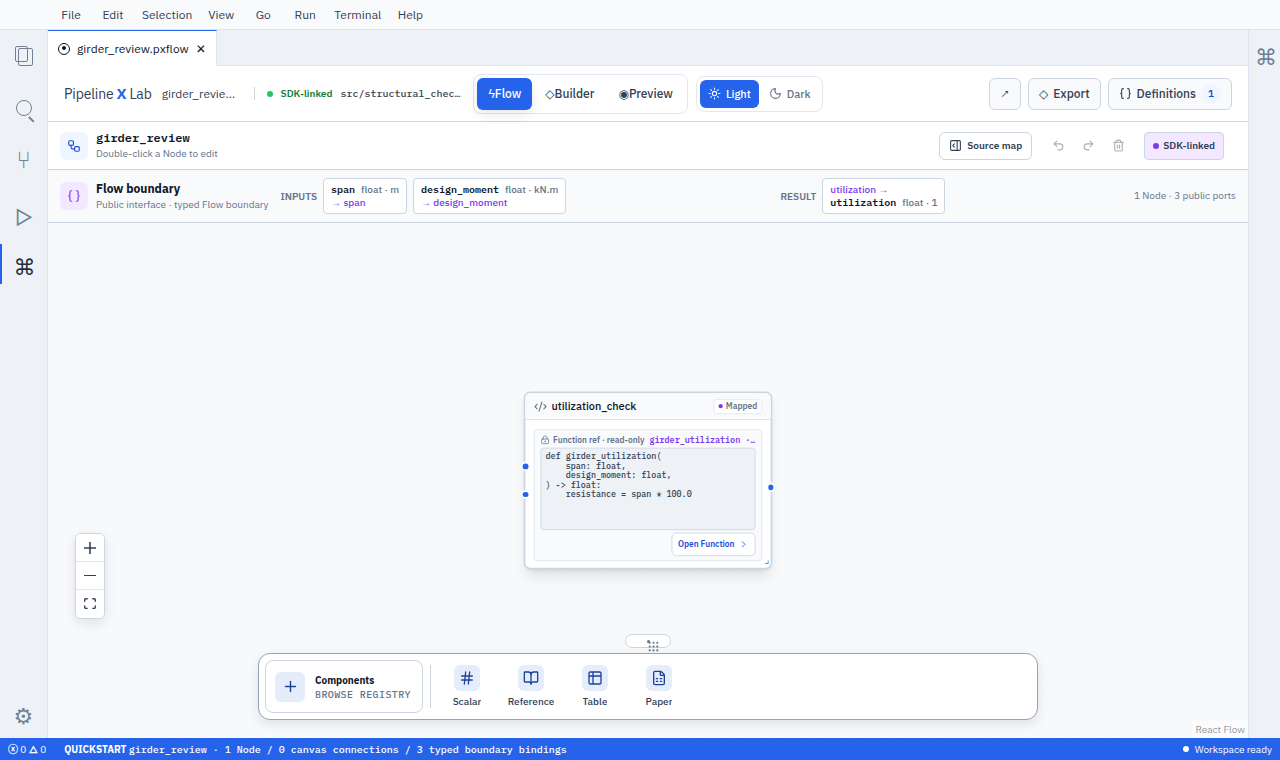
Quickstart Flow — Flow boundary의 두 input과 한 result는 public interface이며 Canvas Node로 세지 않습니다. 실제 Node는 utilization_check 하나입니다.
7. Public import 제공하기
src/structural_checks/__init__.py에서 reusable Function과 result type을 공개합니다.
from .functions import GirderResults, girder_utilization

__all__ = ["GirderResults", "girder_utilization"]다른 사용자는 다음처럼 import합니다.
from structural_checks import girder_utilizationFlow를 재사용할 때는 owning module이 export한 object를 import합니다.
from structural_checks.flows.girder_review import flow as girder_review_flow다른 Flow에서는 이 object를 flow.subflow("subflow_key", girder_review_flow)로 배치합니다. imported Flow를 flow.node(...) target으로 전달하지 않습니다.
현재 Function build contract는 public symbol과 generated .pyi, descriptor가 같은 Function definition을 가리키는지 검사합니다. Component decorator-to-container compiler는 contract_only 단계에서 같은 parity 검사를 추가합니다.
8. Component target과 MCP에서 확인하기
아래 명령은 current V1 wire 호환성을 확인하는 internal/test-only probe이며 production third-party admission 절차가 아닙니다.
python -m pipelinexlab install <component-container-folder-or.pxpkg> \
--workspace <workspace_key> --project <project_key>CLI의 workspace와 project는 current V1 exact ProjectScope data-path로 contribution storage·catalog·detail·execution read까지 보존됩니다. 다만 요청 Project와 authenticated principal의 권한 결속 및 inactive quarantine은 없습니다. 현재 third-party Component activation은 Project authorization과 execution-trust closure가 닫힐 때까지 차단하며 install admission과 Validate/Run을 거부합니다. 기존 Flow에 저장된 exact ComponentRef는 production reader에서 read-only unsupported로 읽을 수 있습니다. closure 이후의 배치는 named result port에서 named Component input port로 flow.connect(...)를 사용합니다. 후속 V2 settings를 component-declared-settings@1로 선언당 최대 8개까지 받고 host control registry가 그립니다. Component rich surface는 RFC-016의 component-rich-surface-declaration@1이 소유합니다.
MCP에서는 Flow와 Function의 같은 key, type, unit과 description을 사용합니다. connection=False port는 일반 connection 목록과 discovery에서 숨기고, Project·실행 권한은 별도 ACL과 Runtime policy로 관리합니다.
9. 배포 후보 만들기 · 계획 toolchain
아래 pxlab package build/publish 흐름은 source decorator에서 release candidate를 만드는 계획 toolchain입니다. current V1 internal/test probe는 manifest와 content/component.json, executor entry를 가진 별도 container artifact의 wire 호환성만 감사합니다.
pxlab package build . --output dist/releaseFunction release candidate에는 package artifact, Function descriptor, dependency lock, SBOM과 signing input이 포함됩니다. Component declaration·executor와 host-declarative presentation metadata를 decorator에서 생성하는 compiler 출력은 contract_only 단계입니다. 수정이 필요하면 source definition을 고친 뒤 다시 빌드합니다.
pxlab package publish dist/release --channel stable배포 전에 다음 내용을 확인합니다.
- 새로 추가되거나 바뀌는 Function version
- current Component companion의 annotation 기반 port shape
- V2 host-owned
component.declarative@2projection; settings는component-declared-settings@1· 선언당 최대 8개 - input/result와 계산 의미의 compatibility
- file, network, secret과 GPU capability
- 지원 Runtime과 platform
- test, descriptor, security와 supply-chain 검사 결과
명령별 역할
| 명령 | 목적 | 이 단계에서 읽는 것 |
|---|---|---|
pxlab package init | 표준 package 시작 | package template |
pxlab package check | SDK definition과 Flow contract 검사 | declaration metadata |
pxlab flow materialize | Flow를 direct .pxflow로 저장 | exported Flow composition |
pxlab studio open | 같은 Flow를 SDK-linked Studio에서 확인 | 저장된 Flow |
python -m pipelinexlab install | internal/test-only V1 wire probe; production third-party admission 아님 | manifest와 container entries |
pxlab package build · 계획 | release candidate 생성 | build-time definition |
pxlab package publish · 계획 | 검토·승인 후 catalog release 생성 | release 검증 자료 |