

Components 사용하기
두 가지 상태를 구분하세요
- 구현된 lane: drop-folder install, Project-scoped exact Component catalog, presentation resolution과 Python worker execution은 저장소에 구현돼 있고 in-repo conformance test가 덮습니다. admitted Component는 host-owned
component.declarative@2body로 투영되며, read-onlyunsupported는 resolve하지 못한 target의 fallback입니다. - 공개 third-party admission — contract_only이고 fail closed: RFC-014는
implementationState: partial-foundation과 그 구현 근거를 기록하지만productAvailability: contract_only를 유지합니다. 외부 publisher의 공개 배포·admission과 package executable UI는 계약만 있고 막혀 있습니다. 아래 Installed/Available 설치 동선과 전용 editor 동선이 여기에 해당합니다.
@px.component는 companion metadata와 annotation-derived port를 등록합니다. 한 container의 다중 선언과 host presentation은 Node presentation과 third-party UI의 generation-2 계약을 따릅니다. 이 내부 구현 상태는 공개 marketplace admission 상태를 대신하지 않습니다.
Component는 Flow에 놓을 수 있는 기능 하나입니다. Components에서 기능을 찾고 Canvas에 배치하면 Node가 되며, input과 result를 다른 Node에 연결합니다.
화면에서 사용하는 네 이름
| 이름 | 사용자가 하는 일 | 예시 |
|---|---|---|
| Built-in Component | 제품과 함께 제공된 기능을 바로 배치 | Python code, Table, Artifact |
| Installed Component · 계획 | Project dependency로 추가된 기능을 배치 | Model viewer, Result table |
| Third-party Component · 계획 | 외부 publisher가 제공한 Component를 설치해 사용 | 외부 해석 도구·시각화 연동 |
| Node | Component를 현재 Flow에 배치한 뒤 연결·설정 | Canvas의 model_view Node |
공개 admission 이후 built-in Component와 third-party Component는 Canvas에서 똑같은 모양의 Node가 되고, 같은 host Node grammar와 연결·설정 방법을 사용합니다. 어디서 온 기능인지와 설치 상태는 Component 상세에서 확인합니다. 구현된 local·관리자 lane의 admitted generation-2 target은 component.declarative@2 body로 표시되고, resolve하지 못한 target과 V1 component.signed@1 target만 unsupported로 표시됩니다.
계획된 installed Component 배치 동선
- PXFLOW Studio 아래의 Components를 엽니다.
- 이름, 하는 일 또는 category로 검색합니다.
- Component를 선택해 input, result와 settings를 확인합니다. 이 catalog/settings UI는 계획입니다.
- Add를 누르거나 Canvas로 끌어 놓습니다.
- Node의 input과 앞 단계의 result를 연결합니다.
- Node를 더블클릭해 연결·typed port를 확인하고 Settings 또는 Component 전용 editor를 엽니다. 이 동작은 계획입니다.
- Validate → Run으로 결과를 확인합니다.
Components의 source filter는 기능의 출처를 빠르게 좁힙니다.
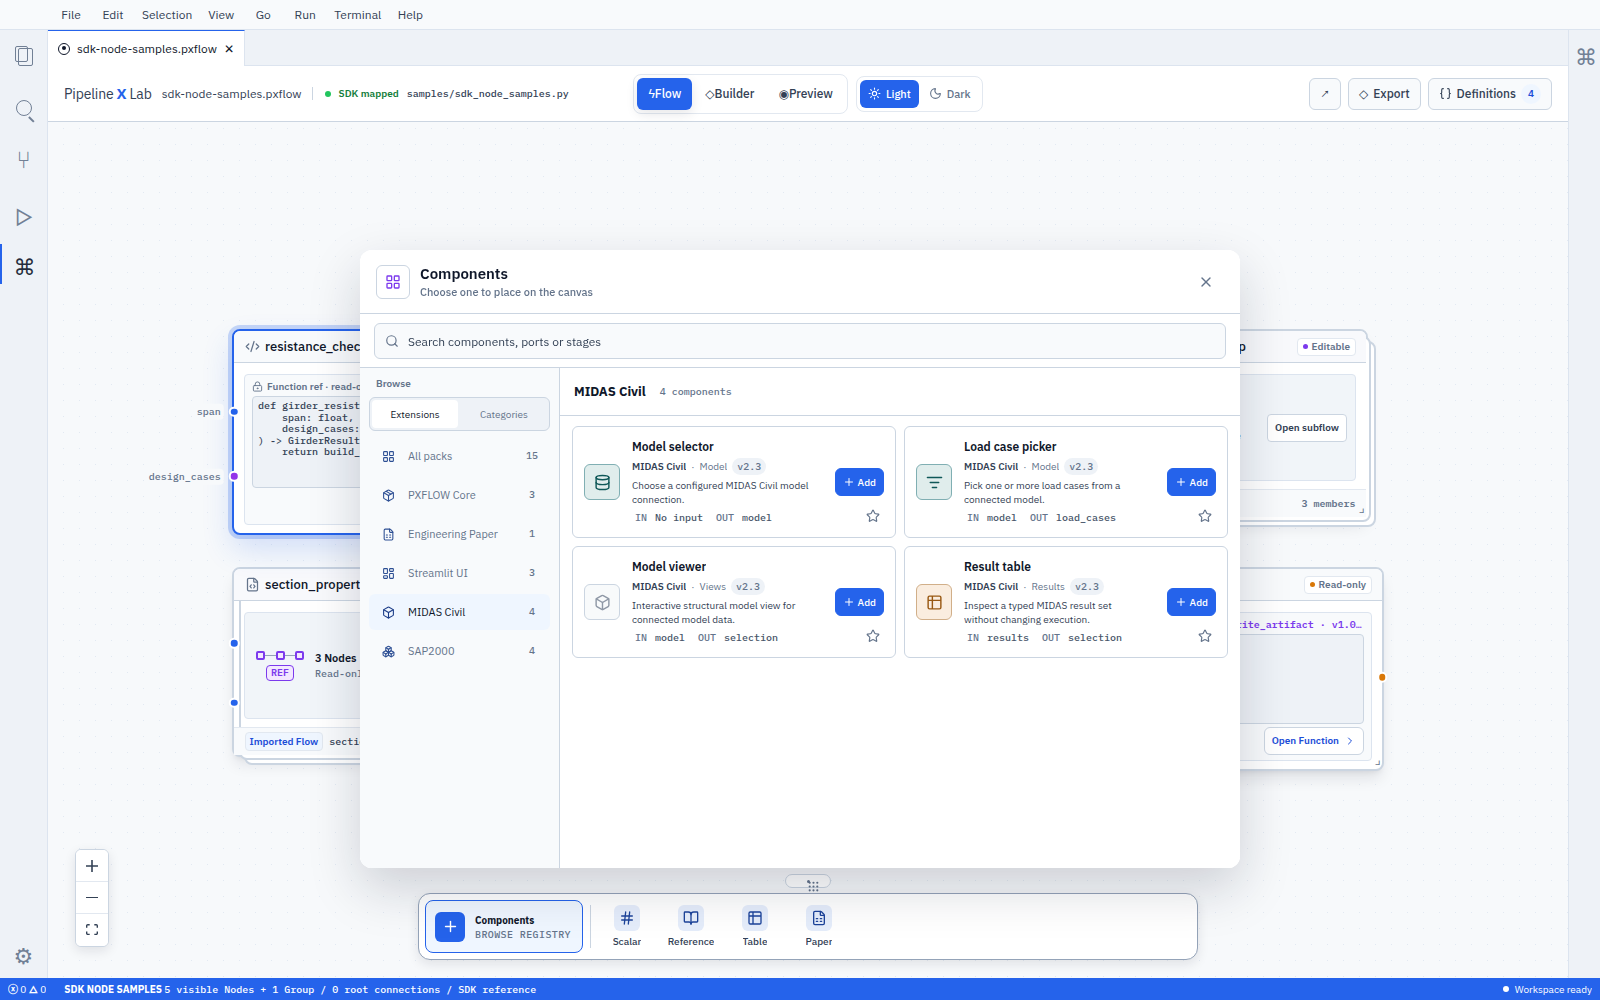
Components에서 기능·제공자·입출력을 확인한 뒤 Add로 현재 Flow에 Node를 배치합니다.
| Filter | 표시하는 항목 |
|---|---|
| Built-in | 제품과 함께 제공되는 Component |
| Installed · 계획 | 현재 Project dependency가 제공할 Component |
| Available · 계획 | Project에 추가할 수 있는 Component |
계획된 Third-party Component 설치
Available에서 Component를 선택하면 설치 전에 다음 정보를 확인합니다.
- Component 이름과 한 문장 설명
- publisher와 source
- 제공 package와 version
- input, result와 settings
- 실행에 필요한 권한과 자원(파일 접근, 네트워크, secret, GPU)
- license, 호환되는 PipelineXLab version과 도움말
향후 Add to project를 누르면 exact package release가 Project → Dependencies에 기록됩니다. 구현된 lane에서 contribution data path는 exact Project scope로 격리됩니다. 공개 third-party admission은 publisher trust store와 signed revocation 검증을 요구하며, 그 둘을 갖춘 뒤에 이 설치 동선이 열립니다. 구현된 local·관리자 lane에서는 resolve된 generation-2 target이 host-owned declarative body로 열리고, resolve 실패나 V1 target은 read-only unsupported로 남습니다.
package 하나가 여러 Component를 제공할 수 있습니다. 사용자는 package 이름보다 먼저 필요한 Component를 찾고, 상세 화면에서 설치 owner와 version을 확인합니다.
Component, package, Extension과 Integration
설치하는 것은 언제나 Component package 하나입니다. Extension과 Integration은 그 package가 무엇까지 제공하는지를 가리키는 분류 이름입니다.
| 용어 | 의미 | 설치와의 관계 | 언제 보나요? |
|---|---|---|---|
| Component | Flow에 배치하는 기능 하나 | package 안에 들어 있습니다 | Components와 Canvas |
| Component package | 필요한 Component를 Project에 한 번에 설치하는 묶음. 버전 갱신도 이 단위로 합니다 | 설치 단위입니다 | Component 상세, Project dependencies |
| Extension | Component와 함께 editor·viewer·adapter·사용자 화면까지 제공하는 package를 부르는 말 | package의 분류입니다 | Extensions 안내와 각 owner 화면 |
| Integration | 외부 제품·서비스·데이터를 연결하는 Extension | package의 분류입니다 | Integrations 안내와 연결 설정 |
향후 Component package가 Component만 제공하면 Components에서 작업이 끝납니다. 격리된 넓은 editor는 RFC-016 surface 계약을 따르며, 외부 publisher package에서 이를 열려면 RFC-014의 공개 admission이 먼저 닫혀야 합니다.
SDK에서 같은 Component 배치하기
계획된 Component 상세의 Use in Python에는 다음 세 이름이 함께 표시됩니다.
| 이름 | 예시 | 역할 |
|---|---|---|
| 설치 이름 | pipelinexlab-midas-civil | Project dependency와 release version |
| import 이름 | midas_civil.components | Python에서 public Component를 가져오는 module |
| Component symbol | model_viewer | flow.node(...)에 전달할 target |
from pipelinexlab import px
from midas_civil.components import model_viewer

flow = px.Flow(
    "model_review",
    label="Model review",
    description="Displays and reviews a structural model.",
)
model = flow.input("model", ModelRef, description="Model to display.")
view = flow.node(
    "model_view",
    model_viewer,
    settings={"display_mode": "solid"},
)
flow.connect(model, view.inputs.model)
flow.result("selection", view.results.selection)model_view는 현재 Flow가 소유하는 Node key입니다.model_viewer는 설치된 package가 제공하는 Component입니다.flow.connect(...)한 줄은 Studio의 port 연결선 하나입니다.settings는 이 Node에서 보존할 schema-free raw Component setting object입니다.
Studio의 Add는 공개 admission 뒤에 열리는 동선입니다. 구현된 lane에서 SDK의 flow.node(...)는 authenticated product resolver가 답한 exact target을 저장합니다. admitted generation-2 target은 component.declarative@2 body로 표시하고, V1 target이나 resolve 실패만 read-only unsupported Node로 표시합니다.
dependency를 사용할 수 없을 때
현재 Flow reader는 저장된 Node key, exact Component identity, raw settings와 연결 사용처에서 유도한 일부 port를 읽기 전용으로 유지합니다. original package bytes는 package artifact owner가 실제로 retained한 경우에만 recovery evidence로 사용하고 Flow 저장값에서 추론하지 않습니다. exact ComponentRef는 보존합니다. package release contribution custody는 canonical declaration과 executor digest를 저장하지만, 공개 recovery UI가 그 full snapshot을 읽어 표시하는 activation은 아직 닫혀 있습니다. 아래 복구 상태와 동작도 계획된 UI입니다.
| 상태 | 확인할 내용 | 다음 동작 |
|---|---|---|
| Component dependency required | 필요한 package와 exact version | Add required package |
| Version mismatch | required/installed version과 contract 차이 | Review update |
| Access required | license, Project policy 또는 capability | Review access |
| Source unavailable | publisher source와 registry 연결 | Retry 또는 Locate package |
dependency를 복구한 뒤 현재 validator가 제공하는 exact target과 연결 evidence를 확인합니다. settings schema와 full contract diff를 이용한 Validate 복구는 별도 versioned settings contract 뒤의 계획입니다.